The previous post involved me trying to convince you that it is worth your while to set up a new Google Account for each business you want to use Google Analytics or Webmaster Tools with. If you haven’t read it and want to know why this little extra step is needed, you can go back and read it, but it is probably faster to just humor me and set up the new account.
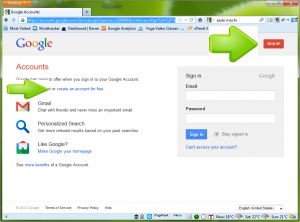
Head to https://accounts.google.com which will send you to the screen pictured below, or right to any Google Account you might currently be logged in on. If you use Gmail as already, I’d recommend opening a different browser, as that will save you a bunch of logging in and out of accounts later. If that’s not possible for some reason, click on your portrait or email address in the top right to get the pop up with the Sign Out button and reach the login/create account screen.
Then, click the Sign Up button top right or the link in the text at the left to get started. Give the new account an easy to remember and recognize name, like [email protected]
I use a gmail account because they are free, and as a core Google product, if ever there is a really serious problem with gmail, there will probably be a big problem with many of it’s other products, including Analytics and Web Master Tools, anyway. Using a Google Apps for Business address would cost you 60 bucks a year, and creates one more link in the chain for notification email, in that your registrar needs to be getting your DNS right.
Two Tips for Making Your Google Accounts
I’m not going to go through the whole process of setting up a Google Account, but I will offer two points of advice:
1) Unless your business has been around for more than 18 years, overcome the temptation to use the founding date of your business as a birthdate. You have to be 18 to open a Google Account, and if you submit your form with a birthday that makes you younger than that, Google will put something in your browser that will keep you from making the account until you clear your cache and cookies from them (or use a different browser).
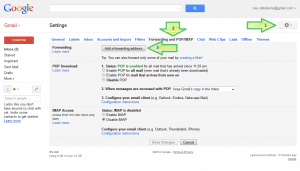
2) Set up forwarding from this account to your main email account. You could add your main account to the notification lists for Analytics and Webmaster Tools, but that is two things you’d have to do instead of one. And Webmaster Tools in particular will send out important emails, like if there appears to be something wrong with your site as far as Google is concerned, and you don’t want to miss those. To set up forwarding, click the Gear button in the top right (just under your email address), then Settings, then the Forwarding and POP/IMAP pseudo-tab, and finally, the Add a forwarding address button.
 After entering and confirming the target address in the two subsequent popups, you’ll need to verify the connection to your main email account. The easiest way to do that is to log into (or switch browsers to) your main email account, and click the link in the verification email that Gmail sends there. Then, you need to log back in (or switch browsers back) to the new account, head back to the Forwarding screen in the settings, select the button next to Forward a copy of incoming mail to…, and click Save Changes at the bottom of the screen. Don’t forget this notoriously easily to forget step.
Next Step
Congratulations: the new Google Account is made, forwarding email to your everyday account, and ready to create Analytics and Webmaster Tools accounts for your website. We can take care of that while we are still logged in to the new account. It’s crucial we get that right or this whole extra account hoop we jumped through will be a waste. We’ll get to the Analytics setup part in the next post, see you there!

Leave a Reply