Depending on how carefully you read automated emails from Google Cloud Platform, you may be preparing for the change to Strict Act-As enforcement in Dataform, or you might be looking to resolve an issue caused by it. Depending on when you read this post, you might also just want to know how to set up your Dataform Releases and Workflows in a way that complies with the Act-As requirements.
What Is Strict Act-As Enforcement in Dataform GCP, and What Is the Impact
Strict Act-As is an extra security check that used to be optional. It prevents Workflows from running with the default Dataform Service Agent, which forces GCP users to be more deliberate with how they set up who gets to create or make changes to which Dataform Workflows.
“Existing Dataform, BigQuery Notebook, BigQuery Pipelines, and BigQuery data preparation workflows using the Dataform service agent will stop running.”
Google Email to Dataform Users
Instead, you need to create a Custom Service Account and configure it to run your Workflows. We’ll go through that step by step below.
Default Dataform Service Agent VS Dataform Custom Service Account
Note that we will use the terms Default Dataform Service Agent and Custom Service Account a lot. The Agent is the principal Dataform creates to run its jobs. The Custom Account is the principal we create to make sure that the Agent is authorized to run the workflow.
As a very loose analogy, think of:
- the Workflow as a building project
- the Default Agent as a tradesperson
- the Custom Account as the project manager
- Google as the construction company
Traditionally, Google would let tradespeople (Agents) just walk onto the building site (Workflow) and get to work, but they want to tighten security. As a result, they are introducing a policy that only project managers (Service Accounts) on that building (Workflow) have keys to the site and the authority to request that the tradespeople (Agents) do work.
For all our building projects (Workflows) where the tradespeople (Default Dataform Agent) are still doing stuff directly, we need to hire a project manager (Custom Service Account), and tell the tradespeople to report to them.
Key Dates
2026-01-19
New repositories created on or after this date will no longer have the option of not using Strict Act-As enforcement, which means you won’t be able to make Workflows run by the Dataform Service Agent.
2026-04-29 – 2026-07-31
Existing repositories will gradually have Strict Act-As enforcement turned on. If you haven’t set things up correctly by then, your scheduled Workflow runs will stop.
Create or Modify a Dataform Workflow to Work with Strict Act-As Enforcement
Whether you are making a new Workflow or changing an existing one, the Act-As part of things is pretty much identical. We’ll
- Make the Custom Service Account
- Give it required permissions
- Give the Dataform Service Agent and appropriate users access to the Custom Service Account
- Create or configure a Workflow to be run by the Custom Service Account
- Turn on Act-As enforcement and test
Even nicer is that the UI design anticipates that people would want to do steps 1-2-3 above together, so we don’t have to wander from page to page to do them. That assumes you are fine with doing things at the project level – you can get more or less granular, but we are keeping things simple for today.
The Default Dataform Service Agent
The instructions assume that you have already created a Dataform repo, and by extension, a Dataform Service Agent. The latter has the default format:
service-(aBunchOfNumbers)@gcp-dataform.iam.gserviceaccount.com
If you changed the default, make a note of what you used instead, as we’ll need it in a bit.
1. Create a Custom Service Account to Run Dataform Workflows
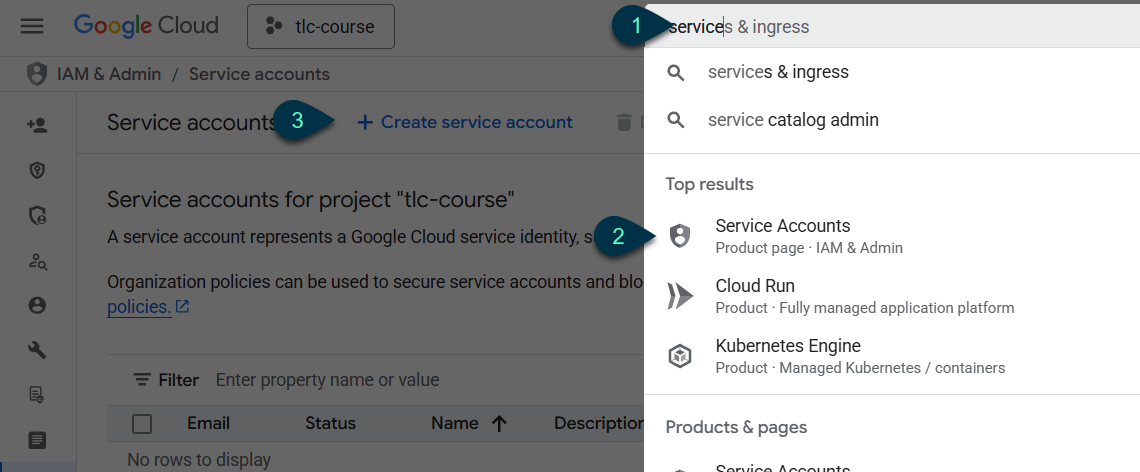
- Search for “service”
- Click on Service Accounts
- On the Service Accounts screen, click on Create service account
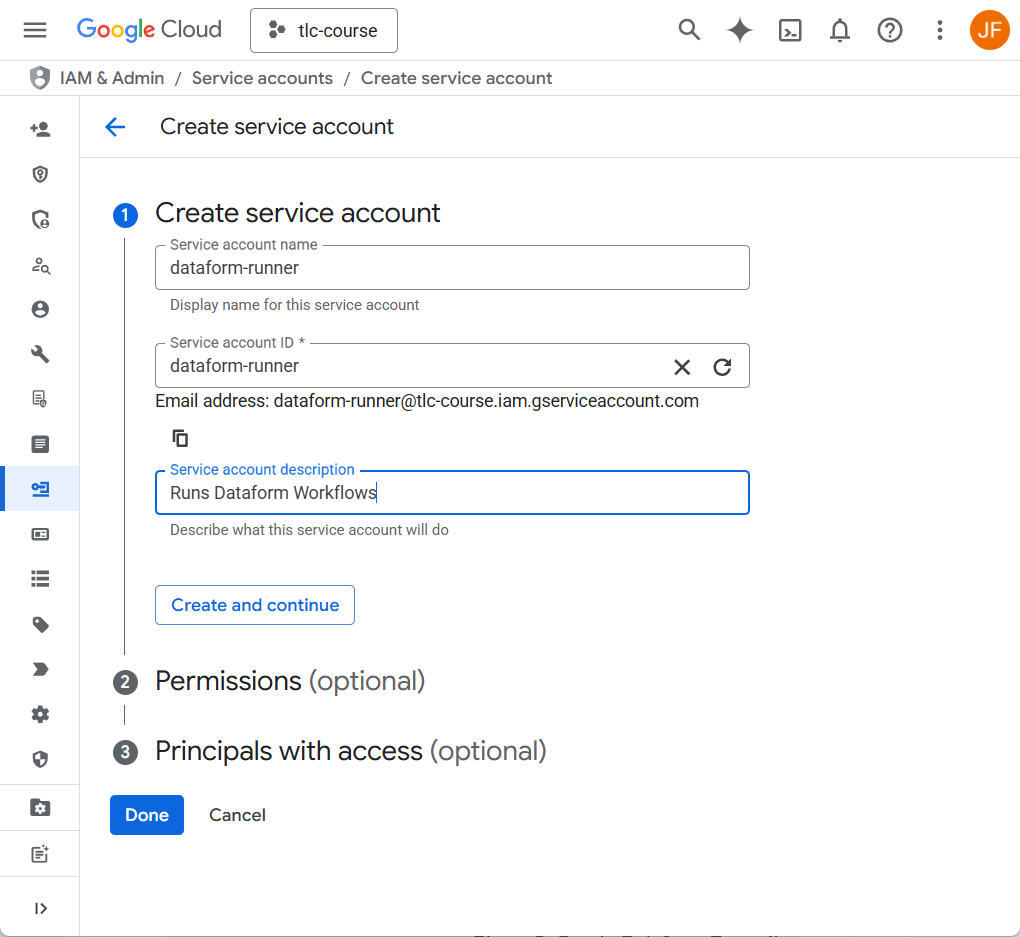
Choose a name, provide a description, and change the autofilled ID if you want. Hit Create and Continue.
2. Set Custom Service Account Permissions
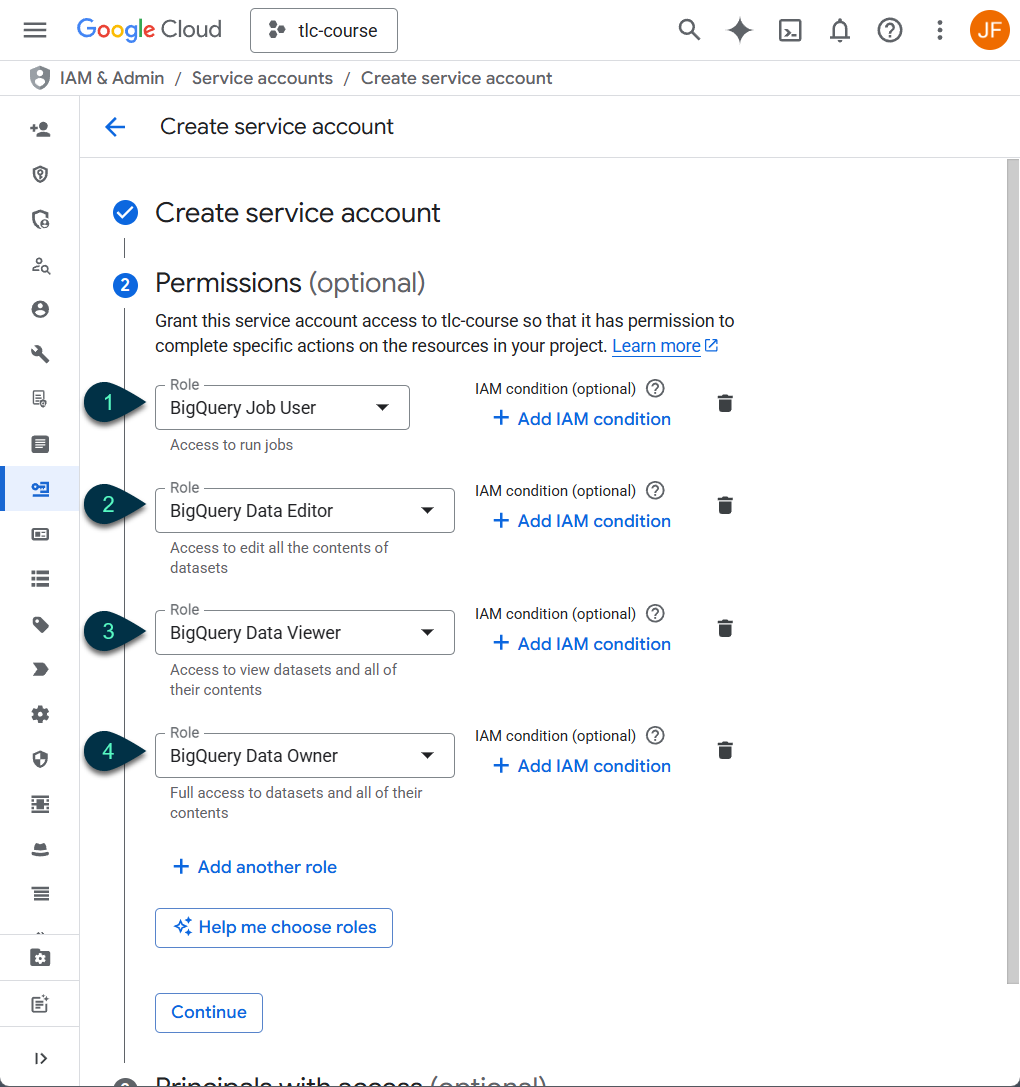
Always defer to your org’s security experts when it comes to setting cloud platform permissions. Some commonly provided permissions in this context are shown.
- BigQuery Job User – Dataform can’t run BQ queries without this one.
- BigQuery Data Editor – Allows Dataform to read, modify, and create BQ tables and datasets, and delete tables.
- BigQuery Data Viewer – Allows Dataform read-only access to tables (if granting permissions at the table or dataset level, it can be a good idea to limit permissions to Data Viewer on source tables you wouldn’t want to accidentally modify).
- BigQuery Data Owner – Use this instead of Data Editor if you need Dataform to be able to delete entire datasets.
Click Continue.
3. Give Access to the Custom Service Account
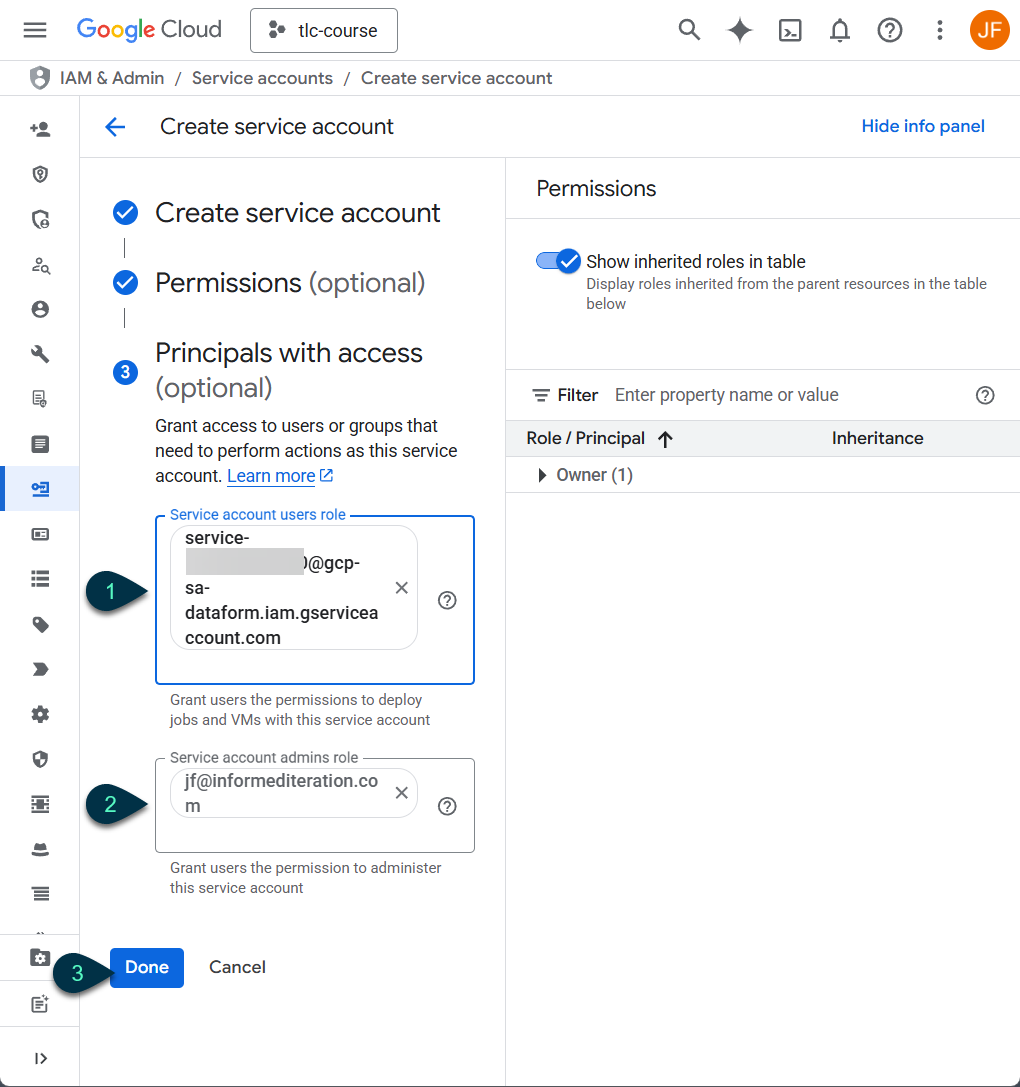
The first principal we should give access to is the Dataform Service Agent that you created when you set up the Dataform Repo. Then we’ll give access to ourselves, and anyone else that needs to configure Releases or Workflows
- Type in part of the Agent ID email in the “Service account users role” and click on the result that pops up. The default, once again, looks like this:
service-(aBunchOfNumbers)@gcp-dataform.iam.gserviceaccount.com
- Add other users based on their Google Accounts. In most cases they should be granted the “Service account user” role , but if you want them to be able to make changes to who has access to the Service Account, or the Service Account itself, including deleting it, you would put their Google Account email in the “Service account admin” box.
- Click Done
That will return you to the list of Service Accounts. Click on the new Service Account and we’ll make sure everything worked as needed. Hit the Permissions tab and the Manage Access button to confirm the permissions you want are there.
Provide Dataform Service Agent with the Token Creator Role
We need to give one more permission to the default Service Agent on the Custom Service Account.
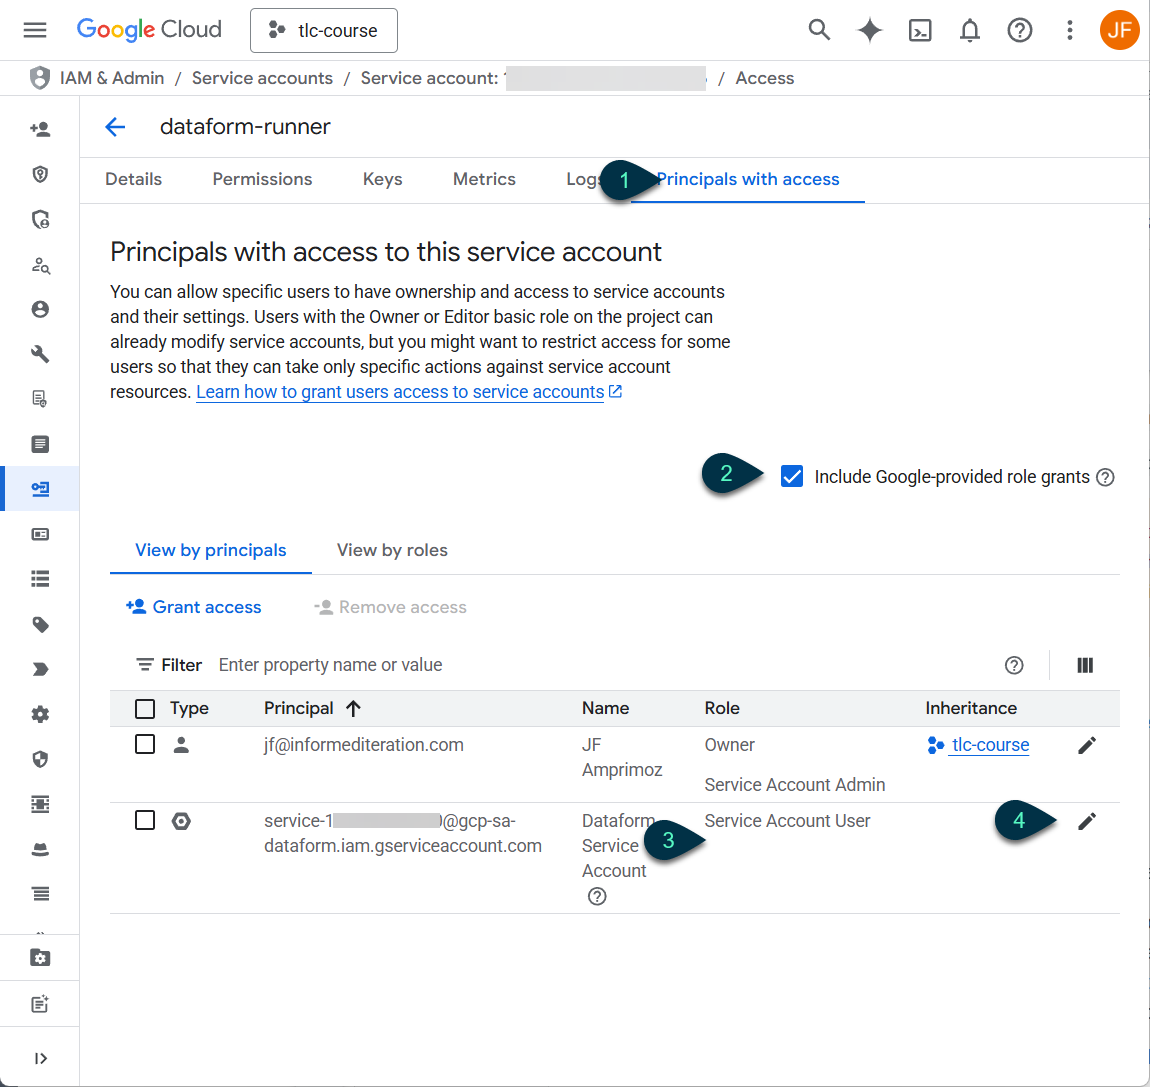
- Go to the “Principals with access” tab
- Check the “Include Google-provided role grants” box
- The Service Agent has the Service Account User role, but they will also need the Service Account Token Creator role
- Click the pencil to edit the Service Agent’s roles
On the fly out, Click “+Add another role” and search for “Service Account Token Creator.” Click on it, then the Save button.
4. Set Your Dataform Workflow to Use the Custom Service Account
Whether you are just switching over existing workflows or creating new ones, there is only one field in the configuration flyout we need to worry about.
Now, it is probably a good idea to create a test Workspace (with some kind of compilation override), Branch, Release, and Workflow while getting the kinks out. We’re assuming you’ve already made the first three, as there is no change to those steps from Strict Act-as enforcement.
Assuming you are still in the repo you want to switch over, head to the “Releases & scheduling” tab, and click “+ Create” to make a new Workflow.
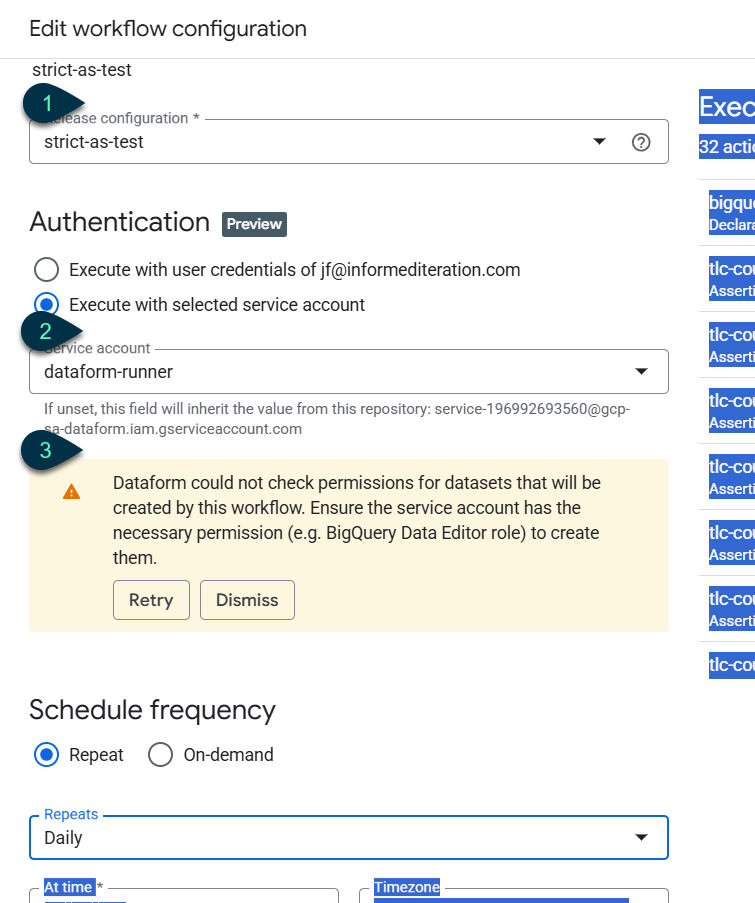
- Set it to use the test Release
- Search for and/or choose the Custom Service Account you made earlier.
- You might get a warning that isn’t very useful, like the one shown here, or you might get an error message with helpful information.
When I was testing, I was blocked from using the Custom Service Account, and the error message told me it was because it needed access to a table in another project to run the workflow in question, making it easy for me to address the issue.
This digression is just to remind you to keep an eye out for anything like that, because the instructions above give the new Service Account permissions only on the currently selected project.
Resolve any errors, assess any warnings, save, and do a manual run. Then wait for a scheduled one to go through as well.
All green? Awesome. There’s one more thing we need to test though.
5. Testing with Strict-Act As Enforcement Before the Deadlines
To make sure your Workflows will run once Google turns on Strict Act-As enforcement, you may want to turn it on manually beforehand and test.
Note that you can only change this setting at the repository level. If you have multiple Workflows in your repo, any that you haven’t switched to the Custom Service Account will fail to run. I’d switch them all to the new Service Account before changing the repo-level setting. For now, you can switch Act-As enforcement back and forth on existing repos, but I’m not sure how Google will handle that after the 19th.
Once all your Workflows are ready,
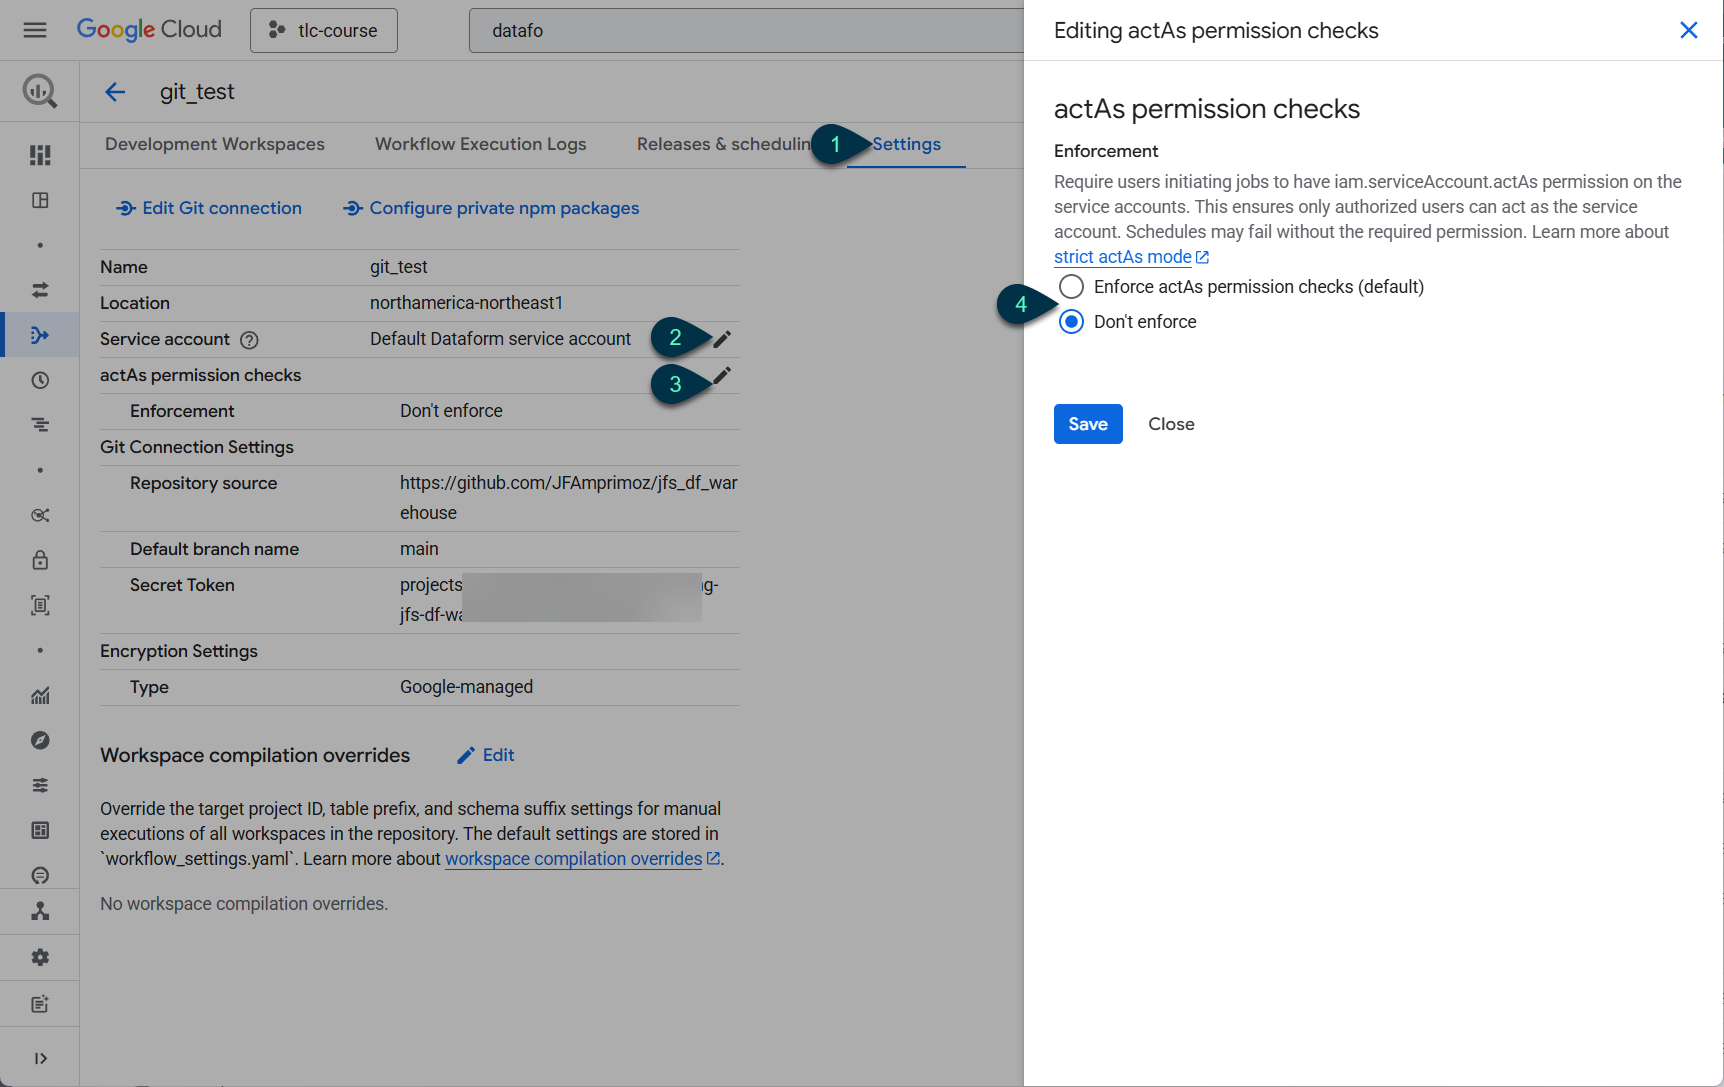
- Hit the rightmost Settings tab in your repo.
- You can update the Service Account default to the new Custom one. The Workflow level settings will override this default, but removing the old Service Agent default will reduce the chance of someone using it by accident. Click the pencil to bring up a flyout, select the new account, and save.
- Click the pencil across from “actAs permission checks” to change it
- Select “Enforce actAs permission checks” and click Save.
You can now run your workflows manually or wait for the scheduled ones to run and keep an eye on the results.
Have you run into any problems with Strict actAs permission enforcement, or found any different solutions? Let me know in the comments or use the contact page to get in touch.
Before I let you go, I got guidance on dealing with this Google Cloud Platform change from Ken Williams at my usual source for GCP info, DiveTeam.
Leave a Reply