With many of us only getting used to BigQuery in the last year or two, getting it to work with Looker Studio and Google Analytics 4 was a learning experience in many ways. A lot of introductory resources rightly focused on getting things up and running, leaving finer details of how to have them run cheaply for later.
Not only would it be too much to learn at once, but given how recently many people had moved to GA4, there wouldn’t be tons of data gathered yet, so putting effort into controlling the size of queries wasn’t a priority.
Returning to the present, you might have noticed your bills creeping up, or maybe you are just looking to make sure that doesn’t happen. You might just be setting something up, and aren’t sure of what it will cost once all the users hit your reports, so you figure it’s better to build things to be efficient just in case.
Wherever you are in the process, partitioning is perhaps the easiest way to avoid unnecessary BigQuery costs, especially when connecting to Looker Studio.
What You Need to Get Started
We’re going to assume that you already have source tables you make by querying the Google Analytics 4 BigQuery export data, and saving the results manually or by scheduled queries. Figuring out what tables you need is a bit of an art, and figuring out how to make the queries for them is more of something you’d learn in a course than from a blog post I’m trying to keep brief.
For now, I’ll just say you can get a lot done with a session-scoped table, a pageview table, and a leads/sales table. I might write more about how to build those in the future, but if you want something more concrete, I’d recommend this course on how to prep GA4 data in BigQuery.
Another note is that we’ll be setting up new scheduled queries in the examples, but you could just as easily add the partitions to existing scheduled queries if you preferred.
The event_date Column Is Not a Date
The good news is that the raw GA4 export is already partitioned by way of table suffixes. The bad news is that this doesn’t get inherited automatically by tables queried from that raw export. But, setting up your BQ tables with partitions, and getting Looker Studio to take advantage of that, is easy.
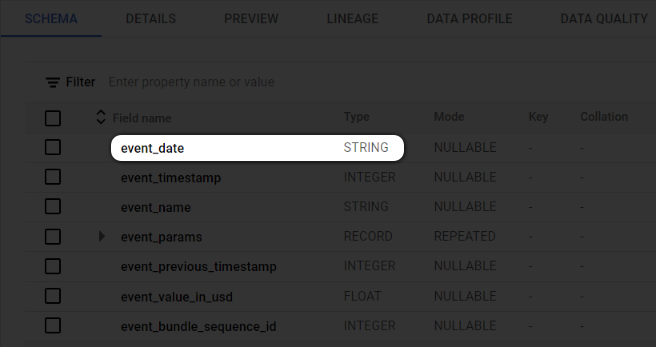
The first thing we need to do is establish what column we’ll be using to do the partitioning on, and event_date seems like a logical choice. There’s one small issue, which is that event_date is considered a string in the schema.

So instead of just selecting event_date, we’ll need to cast it as a date in the SELECT part of our query:
CAST(event_date AS DATE FORMAT 'YYYYMMDD') AS Event_Date
You can easily edit your queries to do this where you currently select the date. We don’t have to call the output Event_Date, but keep track of what you do call it as you’ll need it for the next step.
Tell Big Query to Partition the Resulting Table
Now that we have a suitable candidate, we need to tell BigQuery to use it as our partitioning column. There are lots of ways to do this, but I’m going to lean towards a very common and easy one: configuring it in a scheduled query.
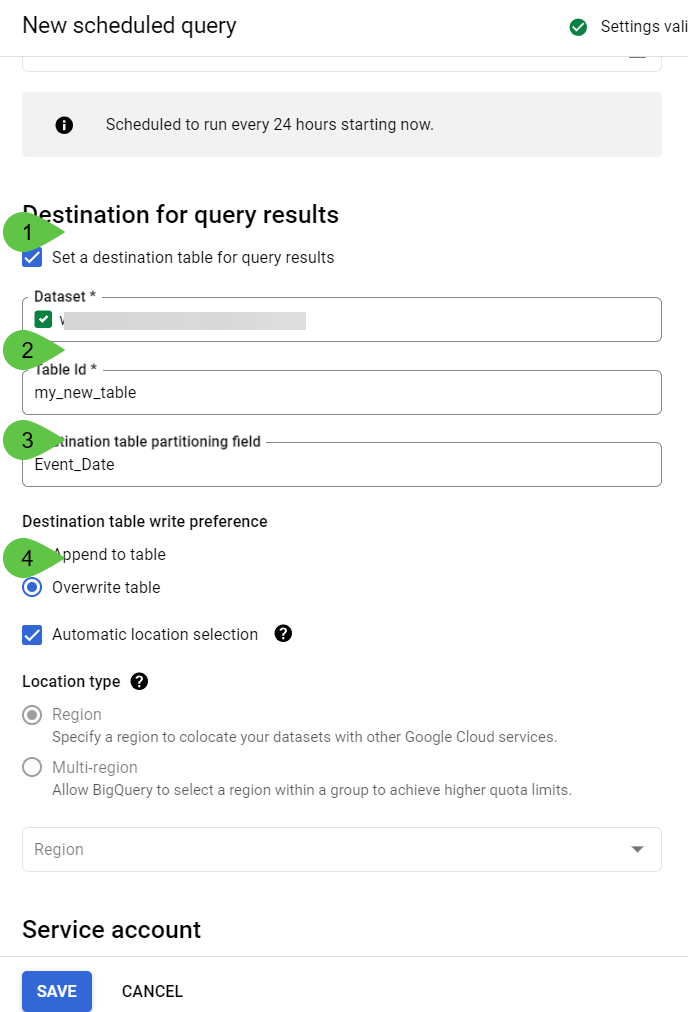
When your query is ready, click SCHEDULE above the main editor window. In the sidebar that appears, name and schedule your query, then scroll down to the Destination for Query Results section. Then:
- Check the box to Set a destination table for query results
- Choose a dataset and name your new table
- Put Event_Date (or whatever you called it) into the Destination table partitioning field

Continue through the form and complete the remaining options. Because of the way the GA4 export works, unless you know what you are doing, it is usually best to select Overwrite table (4. above). The other options can all be left as is if you don’t know what they do. Click save when you are done.
Once your scheduled query has run, you’ll have a partitioned table you can connect to Looker Studio.
One More Crucial Click
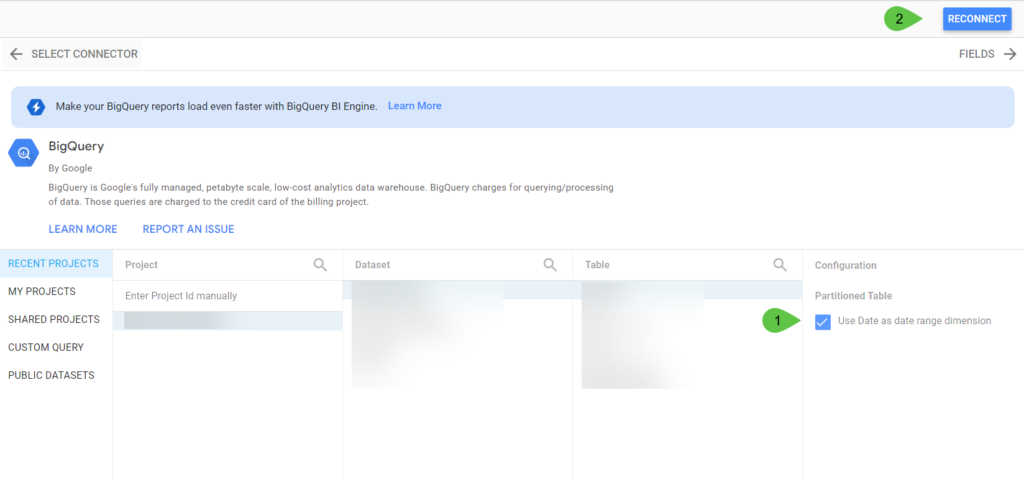
The last step is to make sure Looker Studio takes advantage of your table partitioning. Whether you are setting up a new data source or reconfiguring an existing one, the process is identical once you get to the step where you edit the connection, pictured below.
Choose the project, dataset, and table as appropriate. If everything went well in the steps above we’ll get a checkbox (1) to Use Event_Date (or whatever you called the column you are partitioning on) as date range dimension. Make sure you remember to tick this, or the queries Looker Studio runs to feed the reports won’t take advantage of the partitioning. Hit the Connect or Reconnect button at the top right when you are done (2).

Thanks for reading, and let please me know if you have any thoughts or questions!
Leave a Reply